

This document supplements the more thorough "Help" available within the FCIC/DataScape Nursery Crop Insurance Inventory Software (inventory software). For more detailed information, select Help from the pull-down menus or press the F1 key.
For more information, contact the Nursery Team at rma.kc.nursery@rma.usda.gov.
This document is available at rma.usda.gov/Information-Tools/Nursery-Inventory-Software-EPLPPS.
The DataScape Nursery Crop Insurance Inventory software is available for download from the USDA Risk Management Agency Web site at rma.usda.gov/Information-Tools/Nursery-Inventory-Software-EPLPPS. Be sure to select the Inventory Software for the appropriate crop year.
After downloading the file from the USDA-RMA web site, unzip that file, open the folder, and double-click on the file named “Setup.” Follow the on-screen directions to complete the installation.
Open the Inventory software by double-clicking the desktop icon or selecting the program in your start menu. Click on the File menu in the top menu bar, and then select Plant Inventory. To add a new client name, click on the Client Add button. After entering the name and address information, click on the Client Save button, and you will be given the option to create a plant inventory list.
Make sure that the correct client name is showing in the upper half of the "Client Selection for Plant Inventory" screen. In the lower half of the window, enter the state, county, and hardiness zone where this nursery plant inventory is located. Enter an inventory description (required) and a reference if desired (recommended), which will print on the Crop Inventory Valuation Reports (Valuation Reports). Click on the Inventory section Save button to save this information.
Hardiness zones are determined by the USDA Plant Hardiness Zone Map (PHZM). Some counties may include multiple hardiness zones, and users in those counties will utilize the PHZM interactive website to determine the hardiness zone for their insured growing location(s) within each county. After the user determines the correct hardiness zone through the following steps, the user will enter that information into the "County Hardiness Zone" box in the software. (Additional information can be found in the Help documentation.)
- Go to planthardiness.ars.usda.gov.
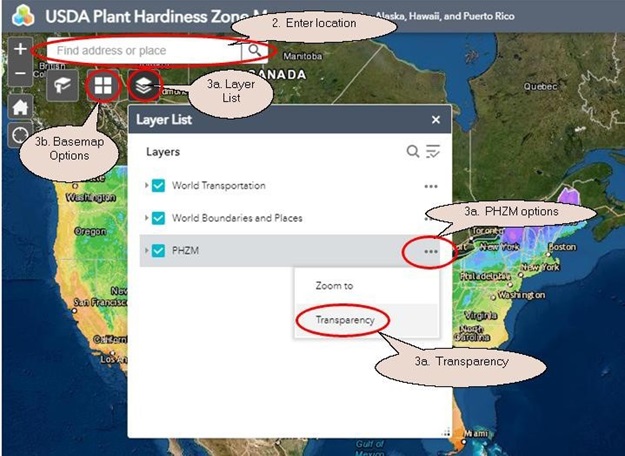
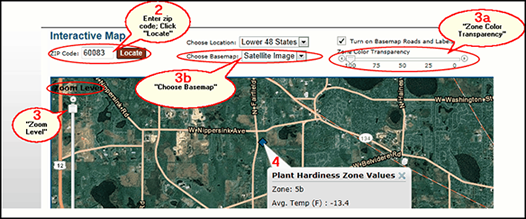
- Enter the zip code of your growing location and click "Locate".
- To precisely locate your growing location, use the Zoom Level function on the left-hand side of the screen in conjunction with one or more of the following functions:
- Zone Color Transparency – the transparency of the hardiness zone colors can be adjusted to expose map details. Click on the “Layer List” icon (
 ), then click on “•••” to the right of “PHZM”, then click on “Transparency”. Adjusting the transparency anywhere from 50 to 100% will allow you to view map details.
 - Map type (Road Map, Satellite, etc.) - Click on the “Basemap Gallery” icon (
 ) to change the type of map display.
- Zone Color Transparency – the transparency of the hardiness zone colors can be adjusted to expose map details. Click on the “Layer List” icon (
- Once you have located your growing location, click on the map in any portion of your growing location to see the pop-up box with your hardiness zone.
After a client is created and an inventory location and a description are defined and saved, you are ready to work with the details of the plant inventory list. With the proper client name highlighted in the upper right half of the window, and the desired inventory location and description highlighted in the lower half of the window, click on the Select button.
The optional Field ID column can be useful for several reasons:
- Distinguish where the same plants of the same size are grown in multiple locations in a nursery.
- You can use the column sort feature to allow flexibility in the order you enter plant names, sizes, prices, and quantities.
- Field IDs will print on Valuation Reports and will also be included when exported for future years.
- Field IDs are required for any insurance claims which are filed, so entering this information up-front will make it immediately available for an adjuster when they import your plant inventory list in the event of a claim.
TIP: In case you prefer not to enter the Field ID as you arrow, Tab or Enter through the plant inventory list, you can right-click with your mouse on the Field ID column name to toggle the column “on” or “off.” With the column “off” your cursor will not include the Field ID box as you use the keyboard’s arrow, Tab, or Enter keys to move through your plant inventory list (though you can still use the mouse to left-click on a desired plant line’s Field ID box, if needed).
After you enter your plant inventory information, you may print a Valuation Report to assist your crop insurance agent in writing your nursery crop insurance policy. With your “Plant Inventory” screen open, in the top menu bar select File, Print, Valuation Report. After you print the Valuation Report you will see a message with the option to print Storage Key descriptions which detail any applicable cold protection requirements for plants on the plant inventory list.
A PDF format document may be printed using "Microsoft Print to PDF" (Windows 10) or through the use of a third-party "PDF Writer" application.
- Select the desired report from the File menu.
- Click on the Printer Setup button and choose the PDF writer from your printer list.
- Click the Calibrate button since you have changed printers.
- When you click the Print button your report will be created as a PDF document - you will be prompted as to the name and location to save the PDF report.
- NOTE: Remember to change your printer back when you want regular paper printing again. You will also need to click the Calibrate button whenever you change printers.
Once you create a plant inventory list, the data is maintained within the Inventory software. To open a previously created list:
- In the top menu bar, select File, Plant Inventory.
- Highlight the desired client name in the Client list.
- In the lower half of the Client Selection screen, select the desired inventory location, description, and reference from the list of inventories which will show for the selected client name.
- Click on the Select button to open the plant inventory list for the highlighted inventory.
There are two options to add plants to your plant inventory list:
OPTION 1 - "Classic": Click on the Classic button to the right of "Select Plant for List". There are many ways to find a desired plant name, including botanical or common name, and several methods to filter, which are described in the Help section (click Help in the upper menu bar or press the F1 key). After you locate the desired plant name, click on the Select button to display a window of the insurable sizes available for that plant.
In the “Size Selection Screen,” double click on every size to be included in your plant inventory list for this particular plant. If desired, you may add multiple lines of the same size. After you select all desired sizes for the shown plant, click on the Continue button to return to the “Plant Inventory” screen to enter your inventory quantities and catalog prices, and the optional Field IDs if desired.
OPTION 2 - "Improved": To add plants to your plant inventory list in a more streamlined single window, click on the Improved button. You may find plant names using any portion of a botanical name, common name, a keyword, and/or a plant type. You may set the Predictive Text Filter to either "Contains Characters" (names will be found based on the text entered occurring anywhere in the name) or "Left-to-Right Characters" (names will be found based on exact match of text starting with the left-most character). Plant names matching the scope of your entered information will be displayed in the lower left section of the window as you type criteria. Highlight the desired plant name in the Plant List window and then select the quantity of any and all size lines you want included in your plant inventory list for this particular plant in the lower right section of the window. Clicking on the Save button will add all of the selected size lines for that particular plant to your plant inventory list without leaving this screen, at which point you may continue selecting additional plant names and sizes. You can return at any time to the Inventory List screen to add your inventory quantities, catalog prices, and optional Field IDs. See the Help section for more detailed instructions.
Yes, you can open and modify a plant inventory list at any time. You may add or delete plants, add or delete sizes, and change quantities and catalog prices. Any time you make changes to a plant inventory list, you will be prompted to save the changes when you exit.
After you finalize a plant inventory list and your crop insurance agent has written your policy, you are strongly advised to export a backup copy of the list as it has been insured and make no further changes to it. You can import a copy of the saved plant inventory data file back into the software as a new description or under a new “Client” name which you can then modify (see backup notes below).
Yes! To save your modifications as a new plant inventory list while leaving the original plant inventory list unchanged, click File, Save As... from the pull-down menu, and enter the description and reference for the new plant inventory list. You will also be presented the option to save a new plant inventory list when you exit your plant inventory list after making changes. The original file will remain unchanged unless you clicked Save or pressed "Control+S" during your session.
You cannot change the plant sizes of an existing size line within your plant inventory list. To modify sizes you must add new size lines and then either delete any unneeded inventory lines or set their quantities to 0.
If your container size is not listed, click on File, Volume Calculator, then Round or Square/Rectangular, depending on your container shape. Insert the dimensions of your container. The size listed in the FCIC Container box is the size you will use when inputting your plant in the software.
When a plant exists in inventory at a size not listed in your catalog or price list, you can determine the "Catalog Price" by using listed prices for other sizes of that same exact plant. When in the plant inventory screen, click on the desired plant line and then on the Missing Size Calculator button, or right-click on the Catalog Price box for the desired plant line, and use the Missing Size Calculator tool to determine the correct price to use.
The Inventory software allows for a virtually unlimited number of plant inventory lists for each client name, as well as multiple clients. Select or create the desired client name, then Add as many plant inventory lists as you need. Different plant inventory lists can be used for each location under the same client. Use the Description and Reference information to differentiate, such as "North Farm" or "Lake Road Farm."
Yes! You can combine two or more plant inventory lists to create a new list. The plant inventory lists you want to combine must be from the same software crop year version and contain the same state, county, hardiness zone, and endorsement information. All plant inventory lists you want to combine must be exported and located in the same folder on your computer. From within the Inventory software, click on File, Merge Plant Lists, and then follow the on-screen instructions. This procedure creates a new plant inventory list data file while leaving the original data files untouched. Once you create the new combined plant inventory list, you will need to import it into your Inventory software. For more detailed instructions on this procedure, see the Help documentation.
Since the data you enter is contained within the Inventory software, the program provides two methods to export a plant inventory list - the regular export in a DataScape format ("DS format") which allows re-importing, and a new "Export to Microsoft Excel" method which cannot be imported back into the DataScape software. There are several reasons to export an inventory file using the regular DataScape format:
- It is highly advisable to backup a plant inventory list and keep it in a safe off-site location for any possible need in the future.
- A file exported from the Inventory software from one crop year can be imported into the next crop year, thereby saving time.
- A file exported from the Inventory software can be imported into the FCIC/DataScape Appraisal software by a crop insurance adjuster, thereby reducing the adjustor's time required to file a claim.
Exporting to the Microsoft Excel format will allow you to utilize the basic inventory information from your Inventory software plant inventory list to aid in gathering plant quantity and pricing data which can then be keyed into the Inventory software. TIP: Sort the Microsoft Excel spreadsheet and the plant inventory list in the same order when you are ready to type in your data.
To export a plant inventory list, select the desired client and inventory. With the "Plant Inventory" screen open, pull down the File menu, select Export, then select either Export Inventory - DS format (Can re-import) or Export to Microsoft Excel (Cannot re-import). Select the desired location and file name and proceed. While you may select any location for the exported file, the default location for exported files is to a folder named EXPORTS within the DataScape Program folder, which is usually C:DATASCAPEDS2018 (where the last 4 digits reflect the crop year of the software). This exported file is very small, and can easily be emailed as an attachment. See "Help" if additional information is needed.
You can import a plant inventory list only from the following:
- A file exported from the Inventory software for the current crop year.
- A file exported from the Inventory software for the previous crop year.
- A file exported from the Appraisal software (used by crop insurance adjusters) for the previous crop year.
- A new file that has been created using the "Merge Plant Lists" procedure which combines multiple plant inventory lists from this same crop year version of the Inventory software.
- A file created as an automatic backup in the DATASCAPEDS2018Backups folder.
You can import a plant inventory list only from a FCIC/DataScape software product as listed above. To import a list:
- Open the Client Selection for Plant Inventory screen (File menu, Plant Inventory). Depending if you want to import a plant inventory list for a new client name, or just import a list into an existing client, choose one of the following steps:
- To add a new client name AND inventory, click on the Import button in the Client section at the top of the Client Selection for Plant Inventory screen, or
- To add a plant inventory list to a client name that already exists, select the desired client, then click on the Import button in the inventory section of the screen (in the lower half of the screen).
- Locate the file you want to import and proceed. (See “What files can be imported?” above)
Note: You can edit the client information or the description and reference information if needed.
Since the Inventory software only imports from the same crop year or one year earlier, you can “hopscotch” the plant inventory list. Assume your plant inventory list file was exported from crop year 2014 software. Open the Inventory software for crop year 2015, import, then export and rename. Proceed through each year so that the data file is properly updated and converted from one year to the next.
No. The Inventory software is currently only available for Microsoft Windows.
The Nursery Grower's Price Endorsement is currently available in 19 States. Those States are listed in the Help (or press F1) menu under Endorsements.
As with all programs and data, it is important to save your work and backup your plant inventory lists. Any time you complete your work on any plant inventory list, you are strongly advised to export that data file using the File menu, Export, Export Inventory - DS format (Can re-import) and save it on another computer, hard drive, memory stick, or disk. This is especially true for any final plant inventory list utilized in the crop insurance.
As an extra safety, any time you make plant inventory list changes and save those changes when you exit your plant inventory list, an automatic backup of the data file will be saved. These automatic backup files are saved in the DATASCAPEDS2018Backups folder and have a name which includes the client and inventory ID numbers, partial information entered in the client name and inventory description, and the date and time of the backup. If there is ever a need to restore one of these files, they may be imported.
The screen view of the plant inventory list can be sorted by Field ID, Plant Name, Common Name, Plant Type, Practice, or Size. If you maintain your inventory quantities by field, then click on the Field ID column name to sort your plant inventory list by that to enter or verify quantities. If you sell most of your 1 gallon plants for the same price, then sort by Size to make price entry easier. Rearrange columns (click and drag column title) to make the order of information more comfortable for you to follow. Column width can also be resized. Right click on the Field ID, Catalog, or Quantity column titles to include or exclude those columns from tab and arrow navigation.
What if you import your plant inventory list from the previous year but you don’t want last year’s prices and/or quantities, or you import a plant inventory list from County A to be used for County B, but you don’t want the quantities? Now you can easily clear all prices or quantities in a list, but be careful! (If you happen to hit the wrong button, just exit and do not save the changes).
If you notice a report with overlapping columns or text or other similar problems, it most likely indicates a need to “Calibrate” the printer. In the process of printing, there is a Calibrate button on the print dialog box. This process only needs to be performed once after the Inventory software is newly installed or when you have changed the printer destination through the Printer Setup button. Printing multiple reports only requires calibration before the first.
Though you may always try to shut down the software program properly, you may encounter situations that result in an improper shutdown. If this happens or you see corrupted information showing on a screen or report, the best action is to re-index the program files. Immediately upon starting the FCIC/DataScape software, pull down the File menu, and select Re-Index.